Monday, August 22, 2011

Zucchini Muffins

Our weekly delivery of fresh produce from Wintergreen Farm in Noti, Oregon has been nothing short of amazing these past few weeks.  With each delivery my fridge is getting more and more jam-packed full of lettuce, sweet carrots, beets, summer squash, berries, green beans, broccoli...I could go on and on.  The fresh basil and tomatoes have by far been my most favorite treat of the summer--I have NO problem getting through those between deliveries.  Some of the other veggies however have been a little more challenging to use up before they go bad or get burried under the next delivery.  This week I've been hard pressed to work my way through an abundance of zucchini.  Fisher and I have had zucchini cakes for breakfast (grated zucchini mixed with egg), we've been eating zucchini sauteed, breaded and pan fried and in any other form I can think of to cook it...including zucchini muffins.

I did a little research online looking for a recipe for zucchini muffins but didn't find anything I was too excited about so, I decided to invent!  Creating a recipe is always fun but a little nerve-racking...thankfully these turned out pretty delicious.  Another zucchini down....


Zucchini Bran Muffins
1 c All-Bran cereal
1/2 c milk
1/4 c vegetable oil
2 eggs, lightly beaten
1/2 c dark brown sugar
1/4 c orange marmalade (I used a orange/lemon jam made by my aunt-in-law)
1 tsp vanilla
1 zucchini, grated and squeezed dry of excess moisture
1 1/2 c flour
2 tsp baking powder
1/4 tsp baking soda
1/4 tsp salt
1/2 tsp cinnamon
pumpkin seeds for tops of muffins(optional)

Preheat oven to 400.

Combine bran, milk and oil in the bottom of a medium sized mixing bowl.  Add in the eggs, sugar, marmalade, vanilla and drained zucchini.  [NOTE: After grating the zucchini drain off excess liquid by placing the zucchini in the center of a clean kitchen towel.  Gather the towel tightly around the zucchini, twisting and squeezing the excess liquid out.]  Stir to combine.  In a separate bowl, combine the flour, baking powder & soda, salt and cinnamon.  Gradually add the dry ingredients to the wet ingredients, stirring just to combine.  Divide the batter evenly into muffin cups (will make about 12 small or 6 large muffins).  Sprinkle the top of each muffin with raw pumpkin seeds.  Bake in preheated oven for about 15-17 minutes or until a toothpick inserted into the center of a muffin comes out dry.  Let cool and enjoy!

Thursday, July 28, 2011

Tomatoes, Tomatoes, Tomatoes

 'Tis the season!  Tomato season!  Not only can you find real, tasty tomatoes at local farmer's markets (or growing in your father-in-law's garden...hint, hint Bob) but you can also get your run-of-the-mill, grocery store variety for a bit cheaper than normal.  I did just that, pick up a TON of plain-Jane tomatoes for very little cash, while conducting one of our bi-annual epic shopping trips to Costco.  A couple flats of beefsteak tomatoes, two pounds of grape tomatoes and two more pounds of Roma tomatoes were headed home with me...destined to be turned into enchilada sauce & marinara sauce.

Both of these sauces are really easy to make and you'll be so glad you put in the time when you pull a jar out of the freezer on a night you really don't feel like cooking anything complicated.  They can be used as a dip, base for soups, or just as they were intended...as sauce.  Oh, so delicious!

Enchilada Sauce
8 beefsteak tomatoes
2 yellow onions
6 cloves garlic
2-3 dried California chilies
2-3 dried Guajillo chilies
2-3 dried New Mexico chilies
1 chipotle chili in Adobo sauce
1 1/2 tsp kosher salt (give or take)
1 tsp cumin (more or less)
pinch of dried oregano

Wash, stem and quarter the tomatoes then place in a large dutch oven or stock pot.  Peel and quarter the onions, add to the pot.  Smash & peel the garlic cloves, throw in the pot.  Stem and seed the dried chilies, tear into chunks and add to the pot.  Add in at least one whole chipotle pepper (the kind you can get in a can, packed in adobo sauce.  You can add more if you like it spicier.  I recommend starting with one and adding more later if you like).  Add enough water to the pot to come about half way up the tomatoes/onions/etc.  Bring to a boil then cover and reduce to a simmer, stirring occasionally.  Let cook for at least an hour, maybe a little more until the tomatoes and onions are totally cooked down and the chilies are soft.  With an immersion blender, puree the mixture until smooth and then stir in your spices, adjusting to your taste.  If you prefer more heat, add in another chipotle and puree that in.  You might want to add more salt than what I listed--just keep tasting and adjusting.  Simmer for another 30 minutes or so, stirring occasionally.  Remove the pot from the heat and let cool slightly.  Transfer the sauce to plastic containers or glass jars and freeze!


Enchilada Sauce                    Marinara Sauce

Marinara Sauce
8 beefsteak tomatoes
1-1.5 lb grape tomatoes
2 lb Roma tomatoes
1 head garlic
extra virgin olive oil
balsamic vinegar
salt & pepper
sugar
1 yellow onion
2 tbsp concentrated tomato paste
1 1/2 tsp each of dried basil and dried oregano
Pinch of dried rosemary and dried thyme
Half bottle of good, dry red wine (I used left over Chianti)
1 can tomato sauce (14.5 oz)

Wash, stem, quarter and seed the beefsteak tomatoes.  Place on a rimmed baking sheet.  Wash, stem, half and seed the Romas, place on baking sheet.  Wash the grape tomatoes (leave them whole) and spread out on baking sheet.  (You might need two rimmed baking sheets to hold all of this.)  Cut the whole head of garlic in half at the equator, place both halves cut side up on the baking sheets.  Drizzle all of the tomatoes, etc with extra virgin olive oil and a little balsamic.  Sprinkle with salt, pepper and a light dusting of sugar.  Roast in a 225 degree oven for about 2-2.5 hours.  
Remove from the oven and let cool slightly.  
Peel and chop the onion into large chunks.  In a large dutch oven or stockpot, saute the onion in about 1/4c of good olive oil on medium heat for a few minutes--until soft and translucent.  Squeeze the cloves of roasted garlic from one half of the head you roasted earlier into the pot--since they have been roasted, the cloves should come right out easily--you may have to use a fork to get a few out.  Stir those around with the onions for just a sec--you don't want them to get too brown or burn.  They're already roasted so their flavor is mild and sweet rather than sharp as they are raw.  Add in the tomato paste and herbs.  Stir, cooking for just a couple minutes.  Pour in the wine, stir to combine, simmer for a few minutes.  Add in all of the roasted tomatoes with whatever juice has gathered in the baking sheets as well as the can of tomato sauce.  Simmer on medium-low heat for 45 minutes to an hour, stirring from time to time.  Using an immersion blender, puree the contents of the pot.  Taste and adjust the seasoning as you see fit.  If the sauce tastes a little acidic, sprinkle in a little more sugar   Remove from the heat, let cool slightly then transfer to containers for freezing.  Enjoy!

Since you only used half of the head of roasted garlic, save the other half for garlic bread or another recipe.  Just store in the fridge and use within a few days.

Wednesday, July 20, 2011

Summertime Grilled Panzanella Salad

Farmer's market was today!  I so look forward to Wednesdays.  Not only do I get to spend the whole day downtown, enjoying the sun and fresh air while selling bread for the bakery, but I also get to do my weekly shopping for fresh, delicious produce and other treats.  Today I picked up these gorgeous berries, sweet yellow tomatoes and artichokes (to be grilled later this week).


After a day of fun in the sun, I was craving a summery dinner and a grilled panzanella salad sounded just about perfect.  Grilled bread, Italian sausage & veggies tossed together with fresh mozzarella, juicy tomatoes and fresh basil, all dressed with an olive oil and balsamic vinaigrette.  Simple and delicious.


Summertime Grilled Panzanella Salad with Italian Sausage
1 loaf good bread (I used ciabatta)
olive oil
 Italian sausage (Use about 1-1.5 links per person.  I used sweet sausage but hot would be better)
1 red pepper, cut into large pieces (grilling size)
1 zucchini, split lengthwise
1 pint cherry tomatoes, halved
2 small heirloom tomatoes, sliced into wedges
8 oz fresh mozzarella, sliced into bite sized pieces
6-8 fresh basil leaves, torn into pieces

Dressing
1/2 tsp honey
1 tbsp balsamic vinegar
3 tbsp olive oil
salt & pepper
pinch of red pepper flakes

Coat the zucchini,red pepper & sausages in olive oil, sprinkle with salt and pepper and place on a hot grill.  Grill the veggies just until their tender and have nice grill marks.  Slice the bread into 1 inch thick slices, drizzle with a little olive oil and grill lightly, just enough to toast.  Cut the grilled bread, sausage, red pepper and zucchini into bite sized chunks and arrange on a platter with the pieces of fresh mozzarella, tomatoes & torn basil leaves.

Whisk together the dressing ingredients and drizzle over the bread salad.  Enjoy!

Sunday, July 17, 2011

Cookies You Can Eat For Breakfast


I have a bit of a cookie problem.  Once I start, I find it VERY hard to stop.  And a cookie for breakfast? Definitely, yes.  So, when I make cookies anymore, I try to up the health factor just a little.  I find it helps reduce the guilt factor.

For these cookies, I just followed the recipe on the inside of the lid on the Quaker Oat tub.  But, I of course had to make a few adjustments.  First of all, I reduced the granulated sugar by 1/4 cup.  For the flour, they called for a cup and a half.  I used 3/4 cup all purpose (unbleached) and 3/4 cup whole wheat flour.  I also added a rounded tablespoon of ground flax meal and about one tablespoon (maybe slightly less than that) of whole flax seed.  I like to have a dried fuit in my oatmeal cookies but I was out of both raisins and dried cranberries but I did have some dried figs.  I put the figs (I think there were about 8 of them) in a saucepan, covered them with boiling water and let them soften up for about 5 minutes.  When they were soft enough, I sliced them up along with a handful of raw almonds.  Fold the the figs, almonds and a handful (about 1/2 cup) of dark chocolate chips to the cookie dough.  Scoop the dough out onto your baking sheets and then sprinkle the top with some raw pumpkin seeds and a tiny bit of kosher salt (so yummy).  Bake at 375 for about 10-12 minutes.  I like to take my cookies out of the oven when they're still slightly underdone in the center.  Let them finish cooking for a few minutes outside of the oven--this keeps them nice and moist and chewy.  Enjoy!

Oh, as for the salt on top of the cookie--this is so good if you like sweet/salty combinations.  I used unsalted butter in the dough and did add the salt they called for in the dry ingredients.  But if you're using salted butter, I would probably reduce the amount of salt you add to the dry mix.

For My Dear, Sweet AJ

Well, I will be the first to admit I'm not doing so great at this food blog thing.  I was all pumped up at the start, so excited to have an outlet for my hobby of cooking.  But here's the thing...I was really trying hard to write out the recipes to be exact measurements, include detailed instructions, etc.  And I'm sorry, but, that's not how I cook.  A regular meal in this house is usually thrown together with little planning, a dash of panic and a hefty serving of a two year old running in circles around my legs screaming at the top of his lungs (he's cute, but he's loud).  So, writing down a recipe and keeping track of how much of each ingredient I used?  Not happening.  That's why I haven't been posting much...or anything, I guess.  But, I've decided, who cares?!  I'll just write about what I cook, give you a quick run down on how I made it and a good estimate of how much of each ingredient I used and you can take it from there.

And my dear, sweet AJ...since you're probably the ONLY person still reading or wanting to read this blog, I'm sending a personal apology to you!  I'm sorry I've been so bad about updating...I'll be better in the future (I hope).  But THANK YOU for reading this and even trying my dishes!  

So now, the food!  I made halibut soup a few days ago.  We have it pretty often (when we have the fish)--it's a dish my mom makes and taught me how to make.  This batch however turned out especially good.


Halibut Soup

1 tbsp Olive Oil
6-8 slices of bacon, cut into 1/2 inch pieces (do NOT use maple bacon--just the plain smokey stuff)
1/2 of a large yellow onion, diced
3-4 stalks of celery, cut into 1/2 inch pieces (I like to use the stalks from the middle of the bunch, with the leaves)
3-4 carrots, peeled and chopped into rounds
~6 cups water
~2 potatoes, diced
dried thyme (about 1 tsp)
celery salt (about 1/2 tsp)
kosher salt (Add to taste.  And, you'll feel like you're using a lot since you're just using 
water as your liquid.  So, just keep adding a pinch at a time until it tastes good.)
fresh cracked pepper (to taste)
fresh halibut (or bass, ling cod, whatever white fish you prefer.  Use enough to serve 2-3 people and cut the fish into 1 in cubes)
1 head bok choy (washed, and cut into 1 in wide ribbons.  Use mainly the leafy parts and half of the white part)

Heat your soup pot on medium heat, add about 1 tbsp of olive oil and cook the bacon bits.  When they are cooked to your liking, remove from pan with slotted spoon and drain on a paper towel.  Leave the bacon grease in your pot, still on medium heat and add in the onion, celery and carrot.  Cook for maybe 5 minutes or so, stirring occasionally.  When they look about halfway cooked through, add in the water, potatoes and seasonings.  Let this cook for at least 15-20 minutes.  Taste the broth and adjust your seasonings as needed.  Taste the veggies to make sure they're done.  About 5-10 minutes before you plan to serve, drop in the cubed fish and bok choy.  Cover, reduce heat to simmer and let that cook for about 5-7 minutes.  The fish should be cooked through and the bok choy wilted and tender.  Taste again...adjust again if needed.

Ladle the soup into a bowl and top with crunchy bits o' bacon.  Enjoy!

NOTE: I haven't always added the bok choy to this soup.  I only did this time because we've been getting a delivery each week from a local farm of fresh veggies.  Over the past few weeks, we've received A LOT of bok choy.  I've been trying to add it into everything.  It was certainly good in this soup!

Saturday, May 21, 2011

Blog Worthy

Oh boy...I have to apologize for not keeping up with this little blog of mine.  Life seems to throw you every once in a while and over the past few months, I feel like I've been seriously tossed about.  Between starting a new job, starting daycare (for my son, not me) and all the separation anxiety and new germs that come with, having to move (that's a whole different story...or maybe I should say saga in itself) along with all the other demands of everyday life, my little blog has been lost in the mess.  We haven't even been eating very well around this house....let alone eating well enough to brag about ;)
But, the dust cloud seems to be settling, and I might just find time again soon to get back to blogging.

For now however, you will have to settle for a picture of one of the most delicious things I've tasted in a LONG time.  We spent the night up the coast visiting with family and tending to some business earlier this week.  On our way south however we of course found time to stop at the fabulous Local Ocean Seafoods restaurant in Newport, OR.  This is by far one of the best restaurants I've ever been to and most definitely the very best for fresh seafood.  Upon seeing that a WHOLE fried rockfish was offered on the menu, my brother just could not resist.  The fish was fried whole, skin on and then drenched in a sweet & spicy sauce made with (this is my best guess) rice wine vinegar, garlic chili sauce, soy sauce, cilantro and probably a few other things I couldn't quite discern.  A feast for the eyes and certainly for the stomach--this dish had to be photographed and blogged about.

Wednesday, April 6, 2011

Girl's Night Hors d'ouvres

I had a few of my new friends over for a girl's night last weekend--such a wonderful night of chatting, eating good food and drinking delicious cocktails & wine.  I wanted to keep the menu simple and elegant so I put out a spread of a few light and fresh hors d'ouvres, served refreshing Moscow Mules and a variety of wines.  I was of course at work right up to a few hours before the girls came over so, I made sure that everything I was planning to cook could either be done a day ahead or was so simple it would be easy to throw together at the last minute.

My first item was sweet honeydew melon wrapped in salty prosciutto.  So easy to make and delicious!  I used a melon-baller to carve out serving of the melon the day before and then shortly before my friends arrived, I wrapped each ball in a slice of prosciutto.  A quick drizzle of fruity olive oil and a sprinkle of finely ground fresh black pepper and they were ready to go!

Next I wanted to serve something a little more filling, so I put together a Caprese bruschetta--toasted slices of fresh baguette topped with oven roasted tomatoes, fresh mozzarella and fresh basil.  I roasted the tomatoes the day before serving by slicing Roma tomatoes in half (pole to pole), removing the seeds then drizzling with olive oil, balsamic vinegar, salt, pepper, a tiny bit of sugar and finely chopped garlic.  They were roasted in a 200 degree oven for about 2-2.5 hours.  Roasting the tomatoes concentrated their flavor and their richness paired deliciously with cool, fresh mozzarella.

Fresh veggies are always a popular dish so, I cut up red pepper, carrots, celery and blanched some fresh green beans to be served with a butter bean hummus.  To make the hummus, I drained two cans of butter beans and then threw them in the food processor with olive oil, salt, pepper and a pinch of red pepper flakes.  Puree until smooth.  I cut all of the veggies the day before as well as made the butter bean dip.  I didn't blanch the green beans until right before the party.  Just trim the end of the beans, drop in a pot of salted, boiling water and cook for just a few quick minutes--you want the beans to be tender/crisp.  Remove from the boiling water and immediately plunge into a bowl of ice water to stop the cooking.  Spread the beans out on a paper towel and let dry before plating to serve.

Being a big fan of cheese, I could have a spread of hors d'ouvres without a brie wheel.  I cut the rind off of the top and sides of the brie then wrapped the whole wheel in a sheet of store bought puff pastry (be sure to seal the pasty together on the underside of the wheel so that your cheese doesn't escape when it melts).  When you are ready to bake, heat your oven to 400 degrees and bake for about 20 minutes--until pastry is nice and golden brown.  I served this with some sesame Melba crackers, green apple slices and thinly sliced hard, dry salami.


I had also recently marinated a mixture of green and kalamata olives in some olive oil, white balsamic vinegar, thinly sliced red chili pepper, smashed garlic cloves and orange slices.  Delicious and almost no work at all!


For a little something sweet, I made a pear tart with goat cheese and honey.  Just roll out a sheet of puff pastry to about 1/8-1/4 in. thick.  In a bowl, stir together about 3 oz of goat cheese with about 2 tbsp of good honey.  Spread this mixture evenly on the pastry sheet, leaving about 1/2 in border around the edge.  Thinly slice 3 or 4 pears and fan out in a decorative fashion on top of the goat cheese mixture.  Sprinkle the top lightly with a little brown sugar and then fold up the edge of the puff pastry to form a rim all around the edge of the tart.  Bake at 400 for about 20-25 minutes until the pastry has puffed up and is golden brown.

The cocktail of the night was my favorite, Moscow Mules--fresh lime juice, vodka and ginger beer (or ginger ale--which is what I used).  Garnish with fresh lime and a thin slice of fresh ginger--so fantastic and refreshing!

I had a wonderful evening of getting to know a few of the friends I've met since moving to this area a little better.  You just can't beat an evening of good food and great company.


Wednesday, March 16, 2011

Gremolata Stuffed Chicken Breasts With Meyer Lemons & Goat Cheese

The recent stretch of gloomy , stormy weather we've been experiencing has left me, to say the least, feeling a bit uninspired.  That lack of inspiration and enthusiasm has been felt deeply in the kitchen and lately, when it comes to cooking meals in this house, I'd say I've been in a bit of a rut.  I needed a bright spot--something to shake me out of the late winter blues.  I'm always more excited about cooking & inspired to experiment with new recipes when I have fresh, delicious ingredients.  So, a text received from a good friend (and fellow foodie) informing me that our local, natural food store had Meyer lemons and blood oranges in stock, had me out the door and dreaming about dinner.

I wanted to make something that was light and fresh but also packed full of flavor.  Using chicken breast (basically a blank slate) as my canvas, I added herbs, citrus and tangy goat cheese to create the beginning of a healthy, flavorful and delicious meal.

Knowing that I would need to have a little starch on the plate to satisfy the preference my husband has for "meat & potatoes" eating, I decided to pair our chicken with a bright, filling salad made of spicy arugula leaves, roasted sweet potato and segments of blood oranges.  So, there you go...you've got meat & you've got potatoes on the plate.  Man food never tasted so good.

 Gremolata Stuffed Chicken Breasts w/ Meyer Lemons & Goat Cheese

Handful of fresh flat leaf parsley leaves
About a tablespoon of fresh rosemary leaves
zest of 1 Meyer lemon
1 tsp olive oil
fresh cracked pepper (to taste)
small pinch of kosher salt

Run your knife through the herbs until they are finely chopped.  In a bowl, combine the chopped herbs, lemon zest, oil, S&P.  Set aside.


2 boneless, skinless chicken breasts
salt & pepper
kitchen twine
2-3 tbsp olive oil
1 Meyer lemon, sliced very thin
2-3oz fresh goat cheese

Preheat your oven to 350 degrees.  Butterfly open the chicken breasts, cover with plastic wrap or parchment paper and using a meat mallet, gently pound until each breast is about 1/4 inch thick.  Be careful not to get too carried away and pound a hole through the chicken--this will make it very difficult to keep the stuffing inside when you roll it up later.  Evenly distribute your gremolata between the two breasts and spread out in an even layer.
 Roll each breast into a log shape and tie closed with your kitchen twine.  If you don't have twine, you can also use toothpicks to pin the roll closed.  In a large, open proof skillet, heat a few tablespoons of olive oil on medium high heat.  When oil is hot (shimmering but not yet smoking) carefully place the chicken breasts in the pan, seam side down, and sear.  Continue to sear the chicken on all sides.

Arrange your lemon slices and bits of goat cheese on top of the chicken, then transfer your pan to the oven and let the chicken finish cooking in there--about 8-10 minutes or until an instant read thermometer reads 165 when inserted into the middle of the breast.  When the chicken is finished cooking, transfer the breasts to a cutting board and let rest for a few minutes.  Carefully slice the chicken into little "wheels" removing the kitchen twine as you go.  Arrange a few wheels on each plate, top with a few of the roasted lemon slices and warm goat cheese.  Delicious!


 Arugula, Roasted Sweet Potato & Blood Orange Salad

2 medium sweet potatoes, peeled and cubed into       bite sized pieces
1 tbsp olive oil
salt & pepper
2 blood oranges
2 big handfuls of fresh, washed baby arugula leaves

Preheat oven to 350.  Toss your sweet potato chunks with olive oil, a pinch of kosher salt and fresh cracked pepper.  Roast until fork tender (about 20-25 minutes). Set aside.

Segment the blood oranges and then squeeze any juice you can get from the remaining membranes of the oranges into a bowl.  I ended up with about a tablespoon of juice.  You'll use this juice for the dressing.  Set aside.

Salad Dressing
1 tbsp blood orange juice
1 tbsp red wine vinegar
3 tbsp olive oil
1/2 tsp good honey
salt & pepper

Whisk all ingredients together until they are nicely combined and the oil is emulsified.  Taste and adjust salt and pepper as you see fit.

To assemble the salad.  Arrange a pile of arugula leaves on the plate, top with the roasted potatoes and orange segments.  Drizzle lightly with the dressing.  Enjoy!


Monday, March 7, 2011

Niçoise Salad

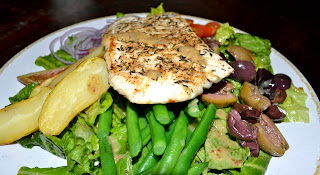
I so enjoy a nice, hearty salad for dinner.  Something filling, but not heavy.  Tonight we enjoyed Niçoise salad--not a totally traditional version but, my own take on it.  Customarily, Niçoise salad is topped with canned tuna fish, anchovy fillets, slices of hard boiled eggs, boiled potatoes, tomatoes, olives and green beans.  I ditched the canned tuna for fresh Ling Cod (caught by yours truly in Alaska this past summer).  Why on earth would ANYONE eat canned tuna when they can have fresh Alaskan fish?

Next, anchovy fillets.  We're a bunch of pretty adventurous eaters but when it comes to anchovies, everyone in this house prefers to enjoy the nutty flavor they provide without having to see the sad little fillets.  So, I incorporated their great flavor by using anchovy paste in the vinaigrette.

Hard boiled eggs--I felt like I had enough going on with the salad that I didn't need the eggs so, I skipped them this time.  But, they would be a delicious addition to this salad so, if you're feeling eggy--add them in!

Boiled potatoes.  Potatoes, yes.  Boiled, no.  I thought I could get a little more flavor in there by roasting them with a little olive oil, salt and pepper.  Simple and delicious.

Tomatoes.  It's almost impossible to find a sweet, flavorful tomato this time of year so I opted for sweet little grape tomatoes.

Olives and Green Beans--yes and yes.  I picked up a mix of marinated olives from the olive bar at the local grocery store as well as some fresh green beans.

Niçoise Salad w/ Ling Cod
8-10 yellow fingerling potatoes, scrubbed clean and dried
1 tbsp olive oil
pinch of kosher salt and freshly ground black pepper
1/2 lb fresh green beans, end trimmed
1/2 red onion, sliced into rings as thinly as possible
1/2 pt grape or cherry tomatoes, halved pole to pole
1/2 pt marinated olives (Niçoise olives are of course great, Kalamata will work too), seeds removed and halved lengthwise
About 6-8 cups of greens, loosely packed (I used a mix of green leaf lettuce and baby arugula and I didn't measure--just use enough to serve 2 people a really large salad or 4 people a side salad)
1.5-2lb FRESH Ling Cod (Any fish would be fine, really.  Salmon, halibut, bass, fresh tuna--whatever you have on hand.  If it's fresh, it'll be good)
1 tsp ground coriander seed
1 tsp dried thyme
salt and pepper
2 tbsp unsalted butter


Salad Dressing
1 1/2 tsp anchovy paste
1 tbsp stone ground mustard
2 tbsp red wine vinegar
1/4 c olive oil
salt and pepper

Preheat your oven to 375.  After scrubbing and drying your potatoes, poke them several times with a fork. Toss them with 1 tbsp olive oil and a pinch of salt and pepper then spread out on a rimmed baking sheet and roast for about 30-40 minutes or until fork tender.  Once they are finished roasting, remove from the oven and let cool for a few minutes before slicing them in half, length wise.  Set aside.

While the potatoes are roasting, bring a large stock pot full of salted water to a boil.  Drop in your trimmed green beans and cook 3-4 minutes only, until tender but still crisp.  Immediately remove from the boiling water and drop into a bowl filled with ice water to halt the cooking.  Remove the beans from the ice water, drain and set aside.


For the dressing: In the bottom of your salad bowl, whisk together the anchovy paste, mustard and vinegar until combined.  Continue whisking while slowly streaming in the olive oil.  Add salt and pepper to taste.  Remove about 1-2 tbsp of the dressing and set aside (will be used to drizzle over the top of the salad later).

For the ling cod: Remove the skin from the fillet, cut into individual servings and pat dry.  Sprinkle lightly with salt and pepper.  Combine the ground coriander seed and thyme in a bowl.  Sprinkle evenly over both side of the fish.  Melt 2 tbsp of butter in a large skillet.  Just as the butter begins to brown, place your fillets in the pan and cook about 2-4 minutes per side (depending on the thickness of your fillet) until just barely cooked through.  Remove from pan and set aside.


To assemble your salad add your greens to your salad bowl with the dressing already in the bottom of the bowl.  Gently toss to evenly coat your greens.  Distribute the greens evenly between serving plates.  Carefully arrange your potatoes, green beans, red onion slices, olives and tomatoes on top of the greens.  Top the whole thing with a ling cod fillet and then drizzle lightly with the little bit of dressing you held out earlier.  Enjoy!

Tuesday, March 1, 2011

Chicken Tortilla Soup

A few years ago, I had the BEST bowl of Chicken Tortilla Soup at a little restaurant in Portland.  It had the perfect amount of spice, was thick and hearty and chock full of flavorful chicken.  I've been trying to recreate it ever since--testing and tweaking several recipes and nothing has compared.  Well, tonight was another attempt and I think we have a winner!  This time I roasted a bunch of tomatoes to intensify their flavor and thickened it up with corn tortillas.  You can make this as spicy as you like but, the chipotle peppers are pretty hot so, maybe just use one pepper the first time you make it and then add in more the next time if you want a little extra heat.

Chicken Tortilla Soup
8-10 tomatoes (I like to use a mixture of romas & vine ripened.  You could also toss in a few cherry or grape tomatoes--just use whatever looks like it'll have the best flavor)
1 medium yellow onion, cut into large chunks
2 cloves of garlic, peeled and left whole
2 tbsp extra virgin olive oil
1/2 tsp kosher salt
1/4 tsp black pepper
1/4 tsp sugar
1-2 chipotle peppers, packed in adobo sauce
3 corn tortillas, torn into small pieces
8 c chicken stock
2 springs of fresh oregano, left whole
4 springs of fresh cilantro, left whole
~2.5 lbs chicken breast halves (w/ribs), skin removed
1 tbsp olive oil
Crunchy tortilla strips (see recipe below) & fresh cilantro for garnish
Sour cream & shredded Monterey Jack cheese for toppings

Preheat the oven to 375.  Quarter the tomatoes (pole to pole) and remove the seeds.  Arrange in a single layer on a rimmed baking sheet along with the onions and garlic cloves.  Sprinkle with olive oil, salt, pepper and sugar.  Roast for about 30 minutes until the tomatoes begin to caramelize and the onions are soft.  Remove from the oven and let cool.

Scrape the roasted tomato mixture into the bowl of a food processor, add in the chipotle pepper(s) and bits of tortilla.  Puree these ingredients together until they reach a smooth, even texture.  Set aside.

In a large soup pot, bring the chicken stock, oregano & cilantro to a boil.  Add in the chicken breasts and reduce the heat to medium high heat.  Cook the chicken in the stock for about 10-15 minutes or until cooked through.  Remove the chicken from the pot and set aside until it's cool enough to handle.  Using two forks, shred the chicken off of the bone into bite sized pieces. Pour the stock through a strainer into a large bowl or another pot to remove the herbs.  Discard the herbs and set the stock aside.  

NOTE: If you want this soup to come together even faster, skip the chicken breasts and get a rotisserie chicken from the grocery store.  Since the chicken is already cooked, just simmer your broth with the herbs while the tomatoes are roasting and then follow the recipe accordingly.

Heat 1 tablespoon of olive oil on medium high heat in your soup pot.  Scrape the pureed tomato mixture into the pot and cook, stirring frequently until it has deepened in color, about 5-8 minutes.  
Pour in your chicken stock and stir together.  Add in the shredded chicken, let everything cook together for just a few minutes and you're ready to serve!  I like to top the soup with crunchy tortillas strips and fresh cilantro.  Serve with sour cream and shredded Monterey jack cheese.


Crunchy Tortilla Strips
8-10 corn tortillas, cut into 1/4-1/2 inch strips
2 tbsp vegetable oil
1/2 tsp kosher salt

Toss the tortilla strips with oil and salt until evenly coated.  Spread in even layer on a baking sheet and bake at 400 degrees, stirring occasionally until crisp and light golden brown.

Sunday, February 20, 2011

Fish Taco Recipes...Delivered

Alright. As promised, here are links to the recipes for the two fish taco dishes I posted earlier.  Enjoy!
                                                                                                                                                        

Wednesday, February 9, 2011

BLT Bliss

I must confess, I have a little crush on bacon.  But, really, who doesn't?  All I could think about this afternoon was a BLT and how great that would be for dinner but, I wanted to make the BLT blog-worthy so, I had to kick it up a notch (or two).

First, the bread.  Going beyond your typical grocery store variety, I needed a fresh and flavorful loaf of something special to build my sandwich upon.  The best bread (& wine selection) in my neck of the woods is found at the fabulous Empire Cafe.  A quick stop there this afternoon and I was on my way with a delicious loaf of fresh ciabiatta and a bottle of Zinfandel.  Happy girl.


Next, the B.  Bacon.  I used some higher quality, thick cut bacon purchased at the grocery store.  Nothing fancy or too expensive--just a step or two up from your regular thin slice bacon.  Done.


Now, the L.  Lettuce.  Wanting something that offered a little more flavor, I decided to go with peppery arugula and fresh basil leaves, tossed with a little olive oil and balsamic vinegar.  Yum.

And finally, the T.  Tomato.  There isn't a whole lot out there that is better than a ripe, juicy, sweet tomato, straight out of the garden, warm from the sun, sliced thick, dressed with nothing more than a little olive oil, salt and pepper.   Oh, my mouth is watering just thinking about it.  But, unfortunately, finding a really tasty, quality tomato at the grocery store, on the Oregon coast, in the middle of February is near impossible.  To get the most flavor out the tomatoes I had to work with, I decided to roast them...low and slow...concentrating their flavor and enhancing their natural sweetness.

It was a sunny day today so, in the spirit of springtime, I decided to include the grill by lightly grilling the bread, the base of this open faced BLT, making it slightly crispy and looking oh so delicious with a few toasty grill marks.

Stacked high on a plate, served with a big glass of Bonterra Zinfandel, our BLTs tonight.....were something to blog about. 


Roasted Tomatoes
If you have the time, the best way to roast these tomatoes is low and slow--200 degrees for 1.5-2 hours.  The flavor after roasting is amazing making them perfect for layering in a caprese salad or on a fancy BLT.  If you're short on time (like I was tonight), you can increase the temp in your oven to about 300 and roast for about 45 minutes.

5 Roma tomatoes, halved pole to pole, seeds removed
2 tbsp olive oil
1 tbsp balsamic vinegar
1/4 tsp kosher salt
1/4 tsp fresh ground black pepper
1/8 tsp sugar

Arrange your seeded tomato halves on a rimmed baking sheet.  Sprinkle evenly with the olive oil, vinegar, salt, pepper and sugar.  Roast at 200 degrees for about two hours (preferred) OR, if you don't have that kind of time, roast at 300 for about 45 minutes.  Remove from the oven, set aside.


While the tomatoes are roasting, fry about 12oz of thick sliced bacon until crispy but not cremated.  Drain of excess oil on a plate lined with a paper towel.

For the greens, combine about 2-3 cups of loosely packed fresh arugula (washed and dried) with 10-12 fresh basil leaves, torn into large pieces.  To the greens add about 2 tbsp of good olive oil, 1 tbsp good balsamic vinegar and about 1/4 tsp each of kosher salt and fresh ground pepper.  Toss to combine.

Slice your good, crusty bread thick and on an angle to create a large surface area.  Lightly drizzle slices with olive oil and grill on a preheated grill (about 250 degrees) until the edges are crispy and you're seeing some light grill marks.  You don't want to over toast the bread and dry it out because it will be too crunchy and harder to eat.

To assemble the BLTs, lay a piece of your grilled bread on a plate.  Place two or three pieces of tomato on top of the bread, followed by a few slices of the cooked bacon and top with a generous pile of the dressed arugula and basil leaves.  Drizzle the whole sandwich with a little more olive oil, and serve with a few slices of avocado on the side.  A fresh take on an old favorite--enjoy!


Friday, February 4, 2011

Grilled Flank Steak with Balsamic Chimichurri Sauce & Smashed Baby Reds

The sun is out....time to start grilling!  I don't care if it's only February--I'm calling it an early spring and taking advantage!  Grilled flank steak is SUPER simple, delicious and fancy enough to serve to guests.  With this delicious chimichurri sauce on top, flank steak goes from good to OH MY G......SOOO GOOD (it might even deserve a little happy food dance--yes, I have a happy food dance--judge away).

Traditionally, chimichurri sauces are generally made with red wine vinegar (or sometimes a white vinegar) but, I like to use good balsamic vinegar because I think it goes so well with grilled meat.

I served our steak with smashed baby reds but, any potato dish would be great.  Smashed baby reds are just a nice alternative to roasted or mashed potatoes.  So, if you're feeling like trying to do something new with those potatoes, give this a try.

Grilled Flank Steak
1.5-2lb beef flank steak
2 tbsp extra virgin olive oil
2 tbsp soy sauce
1/2 tsp fresh ground black pepper

Take the steak out of the fridge about a half hour before you plan to grill it, cover it with the olive oil, soy sauce and pepper and leave out on the counter so that it can come up to room temperature.  Letting the meat warm up a bit before grilling it helps ensure even cooking.  

While this is coming up to room temp, put together your chimichurri sauce.

Chimichurri Sauce
1 generous handful of fresh flat leaf, Italian parsley (about 1 cup, loosely packed), finely chopped
1 generous handful of fresh cilantro, finely chopped
3 cloves of garlic, peeled and finely chopped
1/2 c extra virgin olive oil
3 tbsp really good balsamic vinegar
1/4 tsp kosher salt
1/4 tsp freshly ground black pepper
1/4 tsp red pepper flakes

Combine all ingredients (parsley, cilantro and garlic finely chopped) in a bowl, stir to combine and set aside (at room temperature) to let all of the flavors come together.

Fresh flat leaf parsley and cilantro.
All ingredients in the bowl....
Now you can start prepping your potatoes.

Smashed Baby Reds

2 lbs baby red potatoes, scrubbed clean
2 tsp kosher salt
1 tbsp fresh rosemary, chopped
olive oil for frying
salt and pepper to taste

Place your scrubbed baby reds, whole,  in a large stock pot, cover with cold water salted with 2 tsp kosher salt and bring to a boil at high heat.  Boil the potatoes until they are fork tender but not mushy--you don't want them falling apart.  When the potatoes are done, drain off the water and let them cool slightly (cooling until most of the steam has escaped off of them).

Once they are cool enough for you to handle, smash the potatoes with the broad side of your chefs knife very carefully, only pressing down slightly--you aren't going to mash them totally flat.  The potato skins will burst on the side but if you press them too hard, they'll just completely explode and won't hold together at all.  Be prepared to go through a few 'practice' potatoes until you figure out the right amount of pressure.  (I had quite a few 'practice potatoes').
Once all of your potatoes are 'smashed', put enough olive oil in a large skillet to cover the bottom of the pan and heat on medium-high heat until shimmering but not smoking.  Working in batches, carefully place a few potatoes in the hot oil and fry until crispy and golden brown on each side.  Sprinkle the fried potatoes with salt and pepper and the fresh rosemary.  You can hold these in a warm oven, arranged in a single layer on a baking sheet, until you are ready to serve.
Back to the steak.....

Preheat your grill to about 425 degrees (super hot).  Grill the flank steak for about 4-6 minutes per side (depending on thickness--this is the time we cooked ours so that it was medium-rare on the inside), only moving once to flip over halfway through cooking.  Try not to move the meat around any more than you have to so that you get a good sear on both sides.

Remove the steak from the grill, place on a wooden cutting board with a groove cut around the edge, cover with foil and let rest for at least 10-15 minutes.  Resting the meat before cutting into it will help the meat stay juicy.

When all is ready to serve, slice the flank steak thinly, on an angle and arrange on the large platter.  Surround with the smashed baby reds and garnish the meat with some chimichurri sauce.  Serve immediately and with extra chimichurri sauce on the side.  Enjoy!